

Installing a gas spring correctly is one of those tasks that looks simple from the outside but conceals a surprising number of details that determine whether the unit performs reliably for years or fails within months. Get the mounting geometry right, choose the correct orientation, and match the end fittings properly and a gas spring will work quietly and effectively through hundreds of thousands of cycles without any further attention. Get any of those elements wrong, and you will be dealing with a spring that drifts, loses force prematurely, or creates a safety hazard.
In Malaysia’s manufacturing, fit-out, and facilities maintenance sectors from machine builders in Puchong to cabinet makers in Muar gas springs are installed in everything from industrial press guards and equipment enclosures to office furniture, medical cabinets, and automotive service equipment. The principles of correct installation are the same across all these applications, even when the scale differs enormously.
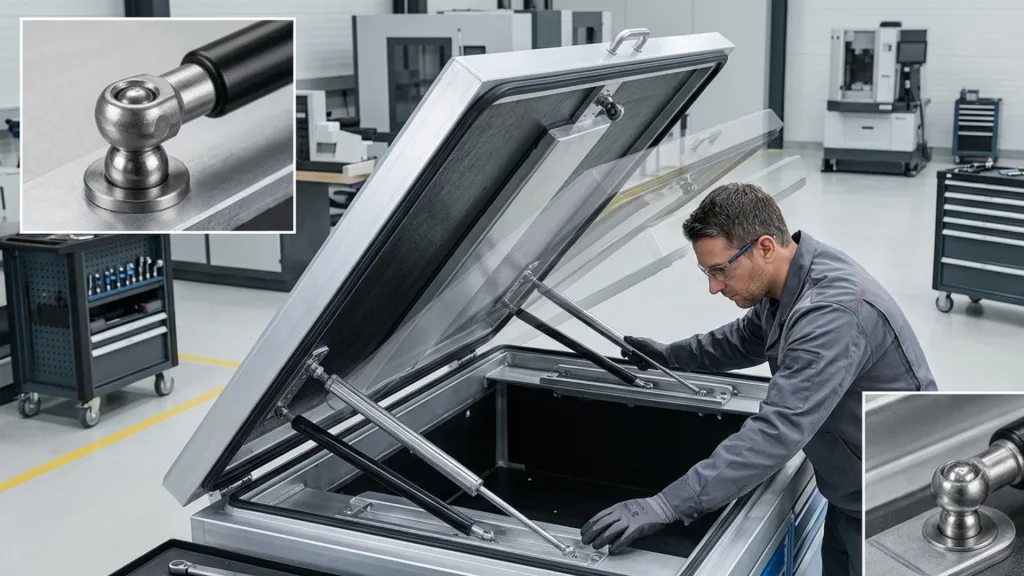
This guide walks through the complete installation process: pre-installation checks, geometry calculation, step-by-step mounting, orientation rules, common errors, and post-installation verification. If you are in the process of sourcing gas springs for a new application, the Hahn Gasfedern precision gas spring range distributed by Eumation is a well-documented starting point that covers the force ratings, stroke lengths, and end fitting configurations needed across most Malaysian industrial and commercial applications.
Before You Install a Gas Spring: Pre-Installation Checks
Rushing the installation without completing pre-installation checks is the most common source of problems that surface weeks or months later. Spend time here and avoid significant rework downstream.
Verify the Specification Against the Application
Before the gas spring goes anywhere near the machine or cabinet it is destined for, confirm three things:
- The extension force (F1) is correct for the load. If you are counterbalancing a hinged component, calculate the required gas spring force using the lever arm ratio: Required F1 = (Load weight in N × Distance from hinge to load centre of gravity) ÷ Distance from hinge to gas spring lower mounting point. Add 15–20% margin to account for friction and temperature variation.
- The stroke is adequate for the travel required. Measure the actual distance the piston rod must travel between the fully open and fully closed positions of the component. The gas spring stroke must be equal to or greater than this measured travel never less.
- The compressed and extended lengths fit the physical envelope. Check that the spring fits between its two mounting points at both ends of travel fully open and fully closed without bottoming out, over-extending, or colliding with adjacent structure.
Inspect the Gas Spring Before Installation
A brand-new gas spring should be inspected before mounting:
- Check the rod surface it should be smooth, chrome-plated, and completely free of scratches, burrs, or contamination. Any surface damage on the rod will score the internal seal with every cycle.
- Check the end fittings ball sockets, clevis brackets, and threaded ends should be undamaged and thread engagement should be smooth.
- Verify force by hand push the rod in slowly and release it. The extension should be smooth and progressive. Any jerking, hesitation, or grinding sensation indicates an internal problem; do not install a spring with these symptoms.
Prepare the Mounting Points
Mounting brackets, pivot pins, and threaded holes that the gas spring will attach to must be clean, correctly dimensioned, and structurally adequate for the loads involved. In particular:
- Pivot pin diameters must match the internal bore of the ball socket end fitting exactly typically within 0.1mm. Undersized pins allow rocking and lateral movement; oversized pins prevent the socket from seating correctly.
- Mounting brackets must be rigid enough to resist the spring force without deflecting. Bracket flex changes the effective geometry under load and can introduce unintended lateral forces on the rod.
- Thread engagement on threaded mounting points should be at least 1.5 times the thread diameter to ensure adequate pull-out strength under dynamic loading.
How to Install a Gas Spring: Mounting Geometry
The geometry of how a gas spring is mounted specifically the relationship between its two mounting points and the hinge axis of the component being supported has a greater influence on performance than almost any other installation variable. This is where most installation mistakes originate.
The Triangle Principle
When a gas spring is used to counterbalance a hinged component (the most common application), the spring, the hinge, and the supported component form a triangle. The geometry of this triangle changes as the component swings through its arc from closed to open. The gas spring must be positioned so that:
- At the closed position, the spring is nearly but not quite fully compressed, with enough residual extension force to begin opening the component when released.
- At the open position, the spring is partially compressed (not at full extension), so it continues to provide counterbalancing force throughout the full open range.
- Throughout the full arc of travel, the spring remains in tension with the load it should never reach a point where the geometry causes it to “cross over” the hinge axis, which would reverse the force direction.
Avoiding the “Over-Centre” Error
The over-centre condition occurs when the gas spring mounting geometry allows the spring to pass through a position where its line of action passes through the hinge axis. At this point, the spring force generates no torque about the hinge and beyond this point, the force direction reverses, causing the spring to push the component closed rather than hold it open. This is a safety-critical error that can cause lids and covers to slam shut unexpectedly.
To avoid over-centre:
- The lower mounting point (on the fixed structure) should be offset from the hinge axis, not coincident with it
- At maximum open position, verify that the spring line of action still generates a moment that resists closing
- If in doubt, prototype the geometry with a rod or rigid link before committing to final mounting hardware
Using Manufacturer’s Geometry Tools
Premium gas spring manufacturers including Hahn Gasfedern provide mounting geometry calculation tools and guidelines in their technical documentation. These resources allow engineers to input hinge position, component dimensions, and load parameters, and receive recommended mounting point coordinates for the gas spring. Using these tools dramatically reduces trial-and-error during installation design.
Steps to Install a Gas Spring Correctly
With specification verified and geometry established, the physical installation of a gas spring follows a consistent process regardless of application.
Step 1: Install the Fixed-Structure Mounting Point First
Begin with the mounting point on the stationary structure the machine frame, cabinet body, or vehicle body panel. Install the bracket or pivot pin at the calculated position, verifying alignment with a square or level as appropriate. Torque all fasteners to specification and check that the bracket does not deflect under hand pressure.
Step 2: Attach the Lower End Fitting to the Fixed Structure
Connect the lower end of the gas spring (typically the cylinder end, not the rod end) to the fixed structure mounting point. For ball socket fittings, press the socket firmly onto the pivot pin until it seats with an audible click a partially seated socket will pull free under load. For clevis or threaded fittings, torque to the manufacturer’s specified value.
Important: Do not apply any rotational force directly to the gas spring body when tightening threaded fittings. Use the flats provided on the fitting itself, not the cylinder body, to apply torque.
Step 3: Position the Component at Full Open
With the lower end of the spring attached, manually hold the supported component lid, door, panel at its intended full-open position. This is the geometry the upper mounting point must be designed around.
Step 4: Mark and Install the Moving-Component Mounting Point
With the component held at full open, offer the rod end of the gas spring up to the component and identify where the upper mounting point needs to be. The rod should be partially compressed not at full extension at this position. Mark the mounting point, withdraw the spring, drill and install the bracket or pivot pin, and verify the position against your geometry calculations.
Step 5: Connect the Rod End to the Moving Component
With the component at full open and the upper bracket installed, connect the rod end fitting to the upper mounting point. Again, verify full seating of ball socket fittings or correct torque on threaded connections.
Step 6: Cycle the Component Through Its Full Range of Travel
Slowly close the component from fully open to fully closed, monitoring for the following:
- The gas spring compresses smoothly without binding or cocking at any point
- End fittings pivot freely throughout the full arc no binding against mounting brackets
- The spring does not bottom out before the component reaches the fully closed position
- The spring does not over-extend rod fully ejecting before the component reaches the fully closed position
If any binding, bottoming, or over-extension occurs, stop and correct the geometry before continuing.
How to Install a Gas Spring: Orientation Rules
One of the most frequently misunderstood aspects of gas spring installation is orientation and getting it wrong consistently shortens service life.
Why Orientation Matters
Inside every gas spring, there is a small volume of oil that serves to lubricate the rod seal. This oil is not pressurised it sits in the cylinder and relies on gravity to remain in contact with the seal. When the rod points downward, the oil naturally pools at the rod seal and lubricates it with every stroke. When the rod points upward, the oil moves away from the seal toward the closed end of the cylinder, leaving the seal to run dry.
Rod-Down Installation (Preferred)
Wherever the application geometry permits, install the gas spring with the piston rod pointing downward. This is always the preferred orientation for maximum service life. In a counterbalancing application with a horizontal hinge axis a typical lid or cover this usually means mounting the spring so that the cylinder (closed end) is at the top and the rod extends downward.
Rod-Up Installation
Rod-up installation is possible with many gas springs but must be specifically confirmed with the manufacturer for the unit in question. Some manufacturers offer “rod-up” variants with a modified internal oil volume that keeps oil in contact with the seal even in the inverted position. Standard units installed rod-up will typically show earlier seal wear and reduced service life.
Horizontal Installation
Horizontal installation with the rod pointing laterally is generally acceptable for most gas spring designs, as the oil distributes along the bottom of the cylinder in contact with both the seal and the piston. Confirm with the manufacturer’s installation guidelines for the specific unit.
For complex or non-standard orientations, the Hahn Gasfedern technical documentation available through Eumation provides clear orientation guidance for each product family, reducing the risk of installing a unit in a configuration that will degrade its service life.
Common Mistakes When You Install a Gas Spring
Even experienced fitters occasionally make installation errors that are not obvious during initial assembly but cause problems over time. Knowing what to look for both during installation and in the weeks following closes the loop on a professional installation.
Mistakes to Avoid
- Painting over the rod never allow paint, primer, or coating to contact the piston rod. Even a thin coat of paint will score the internal seal and cause rapid gas leakage. Mask the rod completely before any painting operation.
- Welding adjacent to an installed spring heat from welding nearby can damage the seal compound and overpressurise the cylinder, which is a safety hazard. Remove gas springs before any welding within 500mm of their mounting location.
- Using the spring as a wiring run support zip-tying cables to a gas spring body transmits vibration and can cause chafing damage to both the cable and the spring’s external surface coating.
- Ignoring end fitting angular limits ball socket end fittings have a rated angular travel of typically 25–35°. If the mounting geometry requires the fitting to operate at its angular limit throughout the stroke, binding and accelerated wear will result. Redesign the mounting to reduce the angular demand on the fitting.
- Installing without a mechanical travel stop on the component if the component being supported can physically travel beyond the spring’s fully extended length (for example, a lid with no end-stop), the rod can be pulled free of the cylinder under certain load conditions. Always install a positive mechanical stop on the component before the spring reaches full extension.
Post-Installation Verification Checklist
After the installation is complete and the component has been cycled several times:
- Check end fitting seating confirm both ball sockets are fully seated on their pivot pins, with no gap between socket body and pin collar
- Verify smooth travel the component should travel from open to closed and back with consistent, smooth resistance and no jerking or hesitation
- Check for force asymmetry if two springs are installed in parallel (as on a wide lid), both should contribute equally. If one side feels heavier than the other, check that the springs are identical specification units and that both mounting geometries are symmetric
- Inspect for rod contamination after several cycles, wipe the rod clean with a lint-free cloth and inspect for any unusual contamination, smearing, or colour change that might indicate seal seepage or environmental contamination
- Document the installation record the gas spring part numbers, force ratings, installation date, and estimated cycle rate. This data is invaluable for planning future preventive replacement before service life is exhausted
Conclusion
Installing a gas spring correctly requires more than threading two bolts into mounting brackets. It demands correct geometry, proper orientation, clean end fitting engagement, and a systematic approach to post-installation verification. When each of these elements is addressed properly, a well-specified gas spring will deliver years of reliable, maintenance-free service holding lids, returning tools, and protecting operators without requiring any further attention.
For facilities teams, machine builders, and maintenance engineers across Malaysia, the quality of the gas spring you install matters as much as the quality of the installation itself. A premium unit with proper documentation, traceable force ratings, and manufacturer-backed technical support is always the more dependable choice particularly in applications where gas spring failure creates a safety or production risk.
To explore the full range of industrial and commercial gas spring options for your next installation, visit the Hahn Gasfedern product range at Eumation. For a broader view of precision industrial components available for Malaysian operations, visit our store and connect with the team for application-specific guidance.